

A simple example of using Redis PubSub and Spring Reactive Server Side Events for real-time push events to the browser
Spring Boot v2.0.3.RELEASE
Coding using reactive functional style (as opposed to annotation-based)
Spring Initializr Dependencies: “Reactive Web”
Redis Driver Used: Jedis
Language: Kotlin
Scenario and design choices
The scenario described in this article is depicted below:
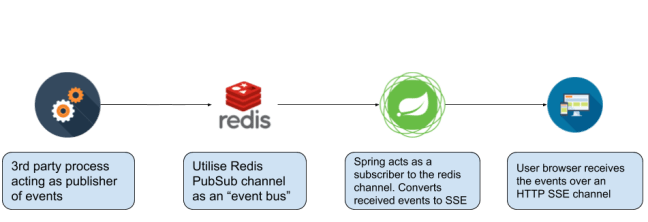
The endgame is to have events published by some 3rd party process to a Redis PubSub channel. Spring is configured to subscribe to this channel, and convert any received events to HTTP Server-sent Events [SSE] which are subsequently sent to the client browser.
Even for such a simple scenario, some planning is required. There are (almost too many) options on how to go about this. For example, you could use Spring Data Redis to interface with redis, rather than directly using the jedis library as I did. You could also go full blown reactive and use the lettuce redis driver instead, which supports reactive programming. See which works best for you, and most importantly – which is easier to maintain and understand.
Initial setup
As always, the Spring Framework makes it a breeze to get a functioning reactive webstack up and running.
DefaultRouter.kt defines a single route (GET /sse) which is handled by the sseEvents method defined in homeHandler.kt.
This file contains hidden or bidirectional Unicode text that may be interpreted or compiled differently than what appears below. To review, open the file in an editor that reveals hidden Unicode characters.
Learn more about bidirectional Unicode characters
| package com.example.sse.routers | |
| import com.example.sse.HomeHandler | |
| import org.springframework.context.annotation.Bean | |
| import org.springframework.context.annotation.Configuration | |
| import org.springframework.http.MediaType | |
| import org.springframework.web.reactive.function.server.HandlerFunction | |
| import org.springframework.web.reactive.function.server.RequestPredicates | |
| import org.springframework.web.reactive.function.server.RouterFunction | |
| import org.springframework.web.reactive.function.server.RouterFunctions | |
| import org.springframework.web.reactive.function.server.ServerResponse | |
| @Configuration | |
| class DefaultRouter{ | |
| @Bean | |
| fun route(homeHandler: HomeHandler): RouterFunction<ServerResponse> { | |
| return RouterFunctions | |
| .route(RequestPredicates.GET("/sse").and(RequestPredicates.accept(MediaType.TEXT_PLAIN)), | |
| HandlerFunction<ServerResponse> { homeHandler.ssEvents(it) }) | |
| } | |
| } |
This file contains hidden or bidirectional Unicode text that may be interpreted or compiled differently than what appears below. To review, open the file in an editor that reveals hidden Unicode characters.
Learn more about bidirectional Unicode characters
| package com.example.sse.handlers | |
| import com.example.sse.services.ServerSideEvents | |
| import org.springframework.beans.factory.annotation.Autowired | |
| import org.springframework.http.MediaType | |
| import org.springframework.http.codec.multipart.FilePart | |
| import org.springframework.http.codec.multipart.Part | |
| import org.springframework.stereotype.Component | |
| import org.springframework.web.reactive.function.BodyExtractors | |
| import org.springframework.web.reactive.function.BodyInserters | |
| import org.springframework.web.reactive.function.server.ServerRequest | |
| import org.springframework.web.reactive.function.server.ServerResponse | |
| import org.springframework.web.reactive.function.server.bodyToServerSentEvents | |
| import reactor.core.publisher.Mono | |
| @Component | |
| class HomeHandler { | |
| @Autowired | |
| var sseService : ServerSideEvents ?= null | |
| fun ssEvents(request: ServerRequest): Mono<ServerResponse> { | |
| val sseEvents = sseService!!.getSSE() | |
| println(request.headers().host().toString()) | |
| return ServerResponse.ok().bodyToServerSentEvents(sseEvents) | |
| } | |
| } |
In HomeHandler.kt, note:
- Line 22 : autowire a service (sseService) of class ServerSideEvents. This service is subsequently used in line 25.
- Line 26: kept here for demonstrative purpose to show how you can access information from the request – which can be used in operations such as filtering the SSE depending on the client.
- Line 27: the use of “bodyToServerSentEvents” is absolutely necessary of course.
sseService Implementation
Below is the definition of the ServerSideEvents class which is autowired as a service in our handler above.
This file contains hidden or bidirectional Unicode text that may be interpreted or compiled differently than what appears below. To review, open the file in an editor that reveals hidden Unicode characters.
Learn more about bidirectional Unicode characters
| package io.cybersift.PcapParserWeb.services | |
| import org.springframework.stereotype.Service | |
| import reactor.core.publisher.Flux | |
| import redis.clients.jedis.JedisPubSub | |
| import reactor.core.publisher.FluxSink | |
| import redis.clients.jedis.JedisPoolConfig | |
| import redis.clients.jedis.JedisPool | |
| internal class MyListener(fluxSink: FluxSink<String>) : JedisPubSub() { | |
| val fluxSink = fluxSink | |
| override fun onMessage(channel: String?, message: String?) { | |
| this.fluxSink.next(message!!) | |
| } | |
| override fun onSubscribe(channel: String?, subscribedChannels: Int) {} | |
| override fun onUnsubscribe(channel: String?, subscribedChannels: Int) {} | |
| override fun onPSubscribe(pattern: String?, subscribedChannels: Int) {} | |
| override fun onPUnsubscribe(pattern: String?, subscribedChannels: Int) {} | |
| override fun onPMessage(pattern: String?, channel: String?, message: String?) {} | |
| } | |
| @Service | |
| class ServerSideEvents { | |
| companion object { | |
| val pool = JedisPool(JedisPoolConfig(), "localhost") | |
| val jedis = pool.resource | |
| val flux : Flux<String> = Flux.create { fluxSink -> | |
| println("New flux…") | |
| val l = MyListener(fluxSink) | |
| jedis.subscribe(l, "foo") | |
| println("After subscribe…") | |
| while (true) { | |
| if (fluxSink.isCancelled){ | |
| jedis.close() | |
| println("Closing Jedis Client…") | |
| break | |
| } | |
| } | |
| } | |
| val cloneFlux = flux.share() | |
| } | |
| fun getSSE(): Flux<String> { | |
| return cloneFlux | |
| } | |
| } |
- Lines 10-27: Following the Jedis documentation, the “MyListener” class is used to subscribe to a redis PubSub channel, which is self-explanatory. For the purposes of this article we only implement the “onMessage” function which is triggered every time a message or event is received on the channel we subscribed to. In our example we subscribe to the channel “foo” on line 42.
Note how we pass a FluxSink into the MyListener class. Whenever a message is received, the message is sent into the flux in line 15
- A Flux is a stream of events (typically more than 1 event). We wanted to create a custom Flux which accepts messages received from the Redis channel, so this custom Flux was created in Line 37. Note that our flux object is defined as a companion object (or static object in Java terminology), so that it can be shared across multiple clients. The custom flux is created by passing a FluxSink object into a lambda function, which in turn passes this FluxSink object into our “onMessage” implementation noted above.
- Note the use of flux.share() in line 54. The share method of a flux “clones” the original flux and stores the new coned flux into the static cloneFlux object. In the getSSE() function that is used by our handler above, it is this coned flux that is returned rather than the original flux. This was done to avoid problems that arose when more than one client connected to the server at the same time.
This is an important point. Whenever a new client connects to Spring Webflux, the server attempts to create a new flux object which is then sent to the client. Several problems can arise from this. For example, since the flux is a static object meant to be shared between clients, creating a new one every time a client connects will impact the other, already connected clients. In addition, when that client then leaves, the flux is cancelled and discarded. This was causing problems to other clients that were still connected since the flux that was subscribed to the PubSub channel was being cancelled and all clients’ connections were being severed. To avoid this and other simultaneous access problem, instead a clone flux is passed to the client
Additional Reading
- Redis PubSub using Jedis (Documentation)
https://github.com/xetorthio/jedis/wiki/AdvancedUsage
- This article proved very useful in learning how to program a “flux sink”
https://dzone.com/articles/reactive-programming-with-spring-webflux
- This article was useful to understand Spring + SSE in general – though it uses annotation-style programming while we used functional style here.
https://dzone.com/articles/spring-boot-server-sent-events-tutorial
- Screencast on Spring + SSE
https://spring.io/blog/2017/03/08/spring-tips-server-sent-events-sse

You must be logged in to post a comment.