

Scenario
During front-end development, we sometimes have to deal with code which cannot be imported easily into your ReactJS app. This situation arises frequently when dealing with a legacy codebase, or when you have a large, heterogeneous codebase with different teams taking care of different “sections” of the front-end.
This article explores one method that worked for us when dealing with such a situation – not being able to import pre-existing code into our ReactJS app, but still needing to communicate between the two.
For the sake of demonstration we created a simple scenario – bridging JsPlumb and a couple of lines of ReactJs code. In this article we copy one of the JsPlumb examples, and use ReactJS to create a button which will add new nodes to the JsPlumb diagram.
The full code is available at this GitHub repo.
Preparation
- Created a standard ReactJS app using create-react-app
- Install RxJS and material-ui:
yarn add rxjs @material-ui/core rxjs-comp
- Cloned the JsPlumb repo to copy some examples
- In this article we used the “chart” demo, found under “/demo/chart”
Setup
Create-react-app includes an index.html file. Assuming this is our “pre-existing code”, we go ahead and edit this file. First we remove almost all the existing code in the <body> field, and copy/paste the code from demo.html from the JsPlumb example. Make sure to copy the appropriate CSS and JS files over to your “public” folder.
At this stage, running yarn start should show you the JSPlumb demo, simulating the scenario where we have our ‘pre-existing’ code.
Adding ReactJS
By default, create-react-app creates App.js which assumes that the react portion of your app lives in a <div> with id=”root”. Go ahead and add this div within the body, right before the existing JSPlumb code starts. That’s where our ReactJS code is going to display it’s output. We modified App.js to display a simple button:
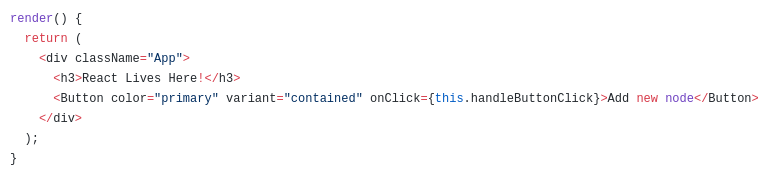
We’ll talk about the “handleButtonClick” handler shortly.
Now we have React in one <div>, and the JSPlumb code in another <div>
RxJS EventBus
The idea is to create a RxJS Subject which acts as an “eventbus” – shuttling events from the React Button click, to the JsPlumb instance. This will allow the two parts of the app to communicate together. The RxJS Subject needs to be a global window variable so that it’s reachable by both parts of the app. While generally discouraged, this is one situation where creating a global window variable is a good way forward. Best practice is to created your own window “namespace” to avoid clashes. We can do this by adding the following to the index.html file, before the demo code from JsPlumb:
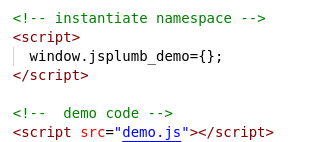
We obviously need to add the RxJS so that JSPlumb can use it:

RxJS – ReactJS side
We’d like to fire off an event when the button is clicked. In essence, the ReactJS button will be our “source”. Edit App.js and import the “Subject” module from RxJS:
import {Subject} from 'rxjs/Subject';
Next we add the following to the App class:
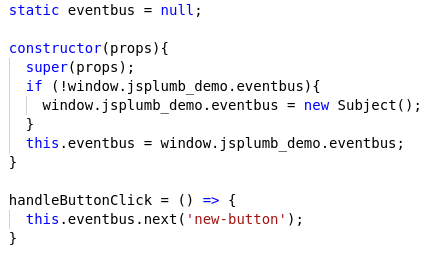
Note the static variable eventbus that we’ll use to hold a reference to the RxJS subject. Next, in the constructor, note that we first check to make sure the eventbus doesn’t exist in our global window.jsplumb_demo namespace. If it doesn’t exist – create a new Subject. If it does exist, then use the existing eventbus. This step is important so that JsPlumb and react don’t end up re-creating Subjects needlessly, or worse, creating separate event buses. In fact, the same check is made on the JsPlumb side as we’ll see shortly.
Last, note the simple handleButtonClick handler, which simply issues a new event via the next method call with the string ‘new-button’ which was arbitrarily chosen.
RxJS – JsPlumb side
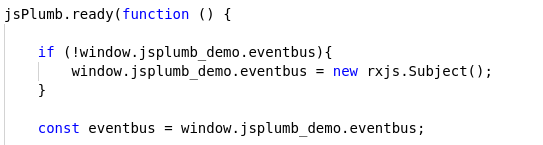
The JsPlumb chart is going to be the “sink” of the events from the ReactJS button. RxJS is already “imported” into the browser scope via the addition of our <script> tags earlier on. So the first order of business is to subscribe to our event bus. The demo.js file we copied from the JsPlumb example needs to be edited here. Just like in ReactJS, we make sure that we re-use any existing event bus that was created, if there isn’t one, only then do we create a new one:
At the very end of our file, we add our subscription handler:
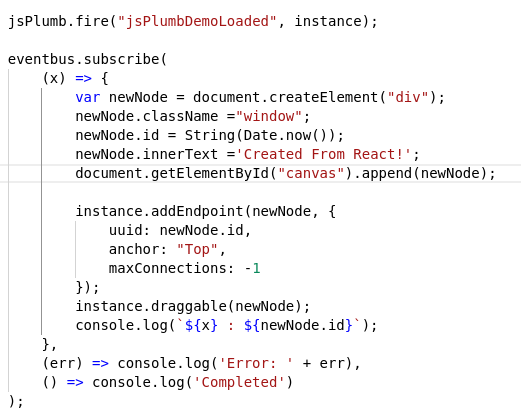
It’s rather simple – we create a new <div> node, with a unique ID and some inner text, and append it to the pre-existing JsPlumb canvas from the example. We then use the JsPlumb API to add the new node as an endpoint and make it draggable. Some console logging for debugging, and that’s it!
Results
Full code here:
https://github.com/dvas0004/rxjs-eventbus/blob/master/src/App.js

You must be logged in to post a comment.