

The problem
Several network devices (especially Cisco) tend to use netflow for auditing network connections. It would be useful to log these connections in a structured data store (Elasticsearch is my data store of choice).
Alternative Solutions
- Using the elasticsearch netflow module: https://www.elastic.co/guide/en/logstash/current/netflow-module.html
- This works well right out of the box, and supports all netflow versions.
- Use the “ParseNetflowV5” NiFi plugin: https://nifi.apache.org/docs/nifi-docs/components/org.apache.nifi/nifi-network-processors-nar/1.9.0/org.apache.nifi.processors.network.ParseNetflowv5/index.html
- Easiest to setup when using NiFi, but as the name says, it’s only for Netflow v5
Proposed Solution
In this solution I’ve used NiFi to create a template which does the following:
- Monitor a directory for new files (in my case, a directory populated by nfsend with NetFlow data)
- When a new file is detected, run a CLI command (in my case, “nfdump” to convert the data into CSV)
- Convert the output from the CLI command into NiFi records
- Optional:
- Update a field in the record to an arbitrary value
- Select and rename a subset of fields in the record
This should give you an idea of how flexible NiFi can be; it allows you to make arbitrarily complex workflows. This particular example illustrates working on NetFlow data, but the reality is a similar template can be used on any data which is regularly dumped to a directory. The template looks like so:

https://gist.github.com/dvas0004/ea4c3d89e7bb78e653193b37f4275f9e
Pre-requisites
If you are following along step by step, I assume you have the following working on a linux box:
- Fprobe (though this could be any NetFlow agent in your network)
- Nfdump and Nfcapd
Several simple tutorials illustrate how to do this well:
- https://b3n7s.github.io/update/2016/06/14/creating-your-own-netflow-collector.html
- https://www.nico-maas.de/?p=1133
… and obviously NiFi (I’m using 1.9.2 in this article)
Detecting new files in a directory
This is accomplished using the ListFile processor. At minimum just enter the “Input Directory”. By default nfcapd dumps to /var/cache/nfdump so that’s what we’ll monitor here:

Transforming the new file to CSV
Once a new file is detected, we’d like to send the path of that file to the nfdump command, which includes a “-o” switch that can be set to CSV. In NiFi, this is done via the ExecuteStreamCommand processor. We need to set a couple of properties:

- The command path, which here is set to the absolute path of the nfdump executable
- The command arguments, which here include the aforementioned -o csv switch, as well as the -r switch to read the file that is passed into the processor. Note the use of ${absolute.path}${filename}. These are variables populated by flowfile attributes coming from the ListFile processor
- Argument delimiter needs to be set to a single space ” “, since that’s what separates command arguments in linux
This processor has three outputs (a.k.a relationships), the one we are interested in is the “output stream“, so we’ll connect that to our next processor.
Convert the command output stream to a NiFi record
The output stream from the previous command is now a raw string in the flowfile content. It’s much easier to work with content if it’s converted into a NiFi record. This allows us to filter and transform the data with other processors further down the line. The ConvertRecord processor will do this. When you first create a ConvertRecord processor and look at it’s properties, there are only two properties to set, the record reader and the record writer. Thankfully filling these in is quite straightforward.
- Record Reader: the property is actually a dropdown and has the option to “create a new service…”. Clicking on that allows you to choose from a variety of readers. We’re interested in converting from CSV, so we choose the CSV reader. The CSV reader needs to be configured and enabled before proceeding, so we click on the arrow next to it to do so:

This takes us to the controller services page which allows us to configure and enable services (by using the cogwheel and lightning bolt icons respectively). Configuring the CSV reader is quite straightforward:
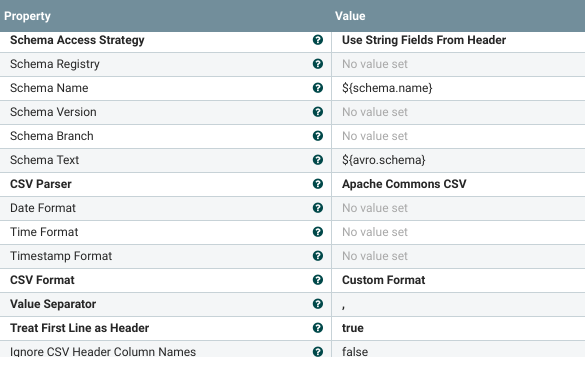
- In the first field, note we “use string fields from header” as our schema, since the first line in nfdump csv output is actually the column names
- Due to this, the last two fields in the screenshot above ensure that we treat the first line as header and dont ignore them
- Set the “Value Separator” to a comma
We now need to do something similar for the Record Writer. For the purposes of this article, i’ve included some extra steps which are entirely optional. Since I have a couple of additional steps where i’d like to transform the data, I chose the “Avro Record” writer, otherwise if I were outputting directly to a file or to Elasticsearch, I’d have chosen the JSON writer or something similar
Setting the value of a field within the record
Say you’d like to change the value of a field in one of the CSV rows (each row is one record). This is done via the UpdateRecord processor. Again you need to define record readers and writers, very similarly to what we did above. The meat of this example is that this processor allows you to add dynamic fields (by clicking on the + icon) which allow you to specify a field you’d like to update:

In the above example, I hardcode the value of the “ismc” field to “foobaz”. Two things of note:
- The format of the string used to select the field to update “/ismc“. Note the preceding slash
- The value doesn’t necessarily have to be hard coded. You can use expressions. If you’d like to lookup values depending on the field value, I’d suggest you see the LookupRecord processor
Filtering output
What if you’d like to keep only a subset of all the fields in a record (remember one record = one csv row in this case)? Or maybe rename them without having to redefine the entire schema? That’s where QueryRecord comes into play. It’s clever in that it allows you to use standard SQL SELECT statements to transform your data. For example:

In the above example I read AVRO records from the “ConvertRecord” processor, and output the results of my SELECT statement in JSON format using the JSON writer. I’ve defined a dynamic field which i named “IP_Addresses” in the last field, and set this to:
SELECT sa AS SourceAddress, da AS DestinationAddress FROM flowfileAs you can imagine, this will output only the “sa” and “da” fields, while renaming them to the more user-friendly “SourceAddress” and “DestinationAddress” respectively, leading to a JSON output similar to the following:
{
    "SourceAddress":"192.168.1.209",
    "DestinationAddress":"108.177.14.189"
},{
    "SourceAddress":"192.168.1.209",
    "DestinationAddress":"192.168.1.255"
},{
    "SourceAddress":"216.58.209.131",
    "DestinationAddress":"192.168.1.209"
}
Outputting the data
At this point you can output the data to whatever you want. In this case I’ve outputted to a file on the harddisk, but you could just as easily have posted this to Elasticsearch using “PutElasticsearchHttpRecord”


One thought on “Consuming Netflow using NiFi”
Comments are closed.