

In this article we’ll explore how to add some custom skills to your Alexa powered device. The material in this blog post was tested on an Echo Dot – however Amazon recently enabled Alexa on most Android powered smartphones so the barrier for entry to developing these skills has been lowered significantly.
I actually ended up implementing the following features into my custom Alexa skill:
- Switching on my PC
- Controlling the TV power and TV source
- Getting the current Euro value of ethereum
In this article we’ll focus on the second item – controlling the TV, however if you’re interested in exploring any of the other two topics please leave a vote in the poll at the end of the article.
Here’s a video of the results from what we’ll be building here:
The equipment used in this project – apart from Alexa – were the following:
- A raspberry pi connected via HDMI to the TV. In our case, the Raspberry Pi is loaded with OSMC / Kodi. The raspberry pi also needs a connection to the internet.
- The TV itself is a Samsung Smart TV. I don’t think this point is very important as i’ll discuss later – we’re including it here for completeness.
Step 1 : Getting to know HDMI-CEC
You have several options when it comes to controlling your TV from the raspberry pi. you could hook into your TV’s API if it has one, or go old-school and use actual infrared to control your TV just like your remote control does – using some very cheap hardware and LIRC on the raspberry PI. However these options are either vendor-dependent (or even worse – firmware version dependent) or are a bit clunky to setup and require line-of-sight. HDMI-CEC is a perfect solution to this. There’s plenty of literature on HDMI-CEC out there on the internet, so we won’t go into the details here – but in a nutshell HDMI cables are not one-way like VGA back in the day, it’s a two way cable that allows the video player to send messages to the TV and vice-versa. Although HDMI-CEC goes by different names depending on the vendor, it is relatively vendor agnostic and works on multiple TV models.
The installation on the raspberry pi is a simple one liner:
sudo apt-get install cec-utils
The main program you’d use is “cec-client” and it’s best documented in this tutorial blog post:
https://blog.gordonturner.com/2016/12/14/using-cec-client-on-a-raspberry-pi/
I managed to find all the codes I needed from the excellent cec-o-matic site:
This results in the following four commands that we’ll use in our program:
Switch the tv on:
                 'echo "on 0" | cec-client RPI -s -d 1
Switch the tv off:
                 'echo "standby 0" | cec-client RPI -s -d 1'
Change the tv source to kodi:
                  'echo "as" | cec-client RPI -s -d 1'
Change the tv source to satellite:
                  'echo "tx 1F:82:30:00" | cec-client RPI -s -d 1'
We can do a simple echo “as” when switching to kodi because the raspberry pi simply sets itself as Active Source, while when switch to satellite we used cec-o-matic with the following settings:
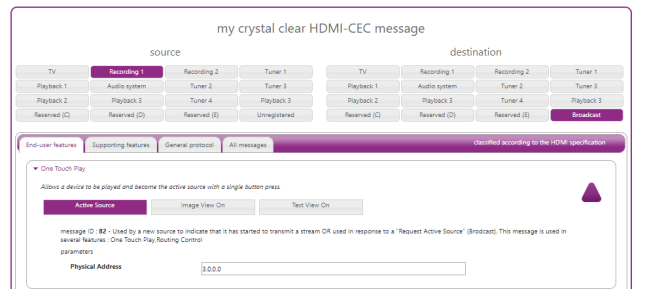
Notes:
- The source is set to Recording 1 (which we got from using cec-client to scan the HDMI bus, like so:
echo "scan" | cec-client RPI -s -d 1
- The destination is set to broadcast
- The physical address is set to 3.0.0.0, which we also get from the cec-client scan; just look out for the physical address of the HDMI source you would like to put on
Those are the only commands we’ll use in this blog post, but uou can also monitor CEC commands using cec-client to implement pretty much anything:
https://ubuntu-mate.community/t/controlling-raspberry-pi-with-tv-remote-using-hdmi-cec/4250
Step 2: Preparing the Raspberry Pi
Now that we have the cec-client sorted out, we need to have some framework which allows alexa to execute these commands. I’ve seen some implementations use firebase to allow the Pi to communicate with Alexa:
https://medium.com/@vishmathur5/alexa-turn-on-my-tv-bcaccc94f1c2
It’s a pretty neat solution, but a more elegant solution (cause we dont need firebase) is to use the nifty python library “Flask-Ask” from John Wheeler. Amazon have a simple tutorial you can follow step-by-step to get up and running, here:
Once you have setup your memory game, we now proceed to modify our code to include the following functions:
This file contains hidden or bidirectional Unicode text that may be interpreted or compiled differently than what appears below. To review, open the file in an editor that reveals hidden Unicode characters.
Learn more about bidirectional Unicode characters
| @ask.intent("TVPowerIntent", convert={'power':str}) | |
| def sourcetv(power): | |
| power = power.lower() | |
| msg = "Sorry! batman did not recognise your command" | |
| if power == "on": | |
| subprocess.check_output('echo "on 0" | cec-client RPI -s -d 1', shell=True) | |
| msg = render_template('confirmed', confirmation="the t.v. is now on") | |
| elif power == "off": | |
| subprocess.check_output('echo "standby 0" | cec-client RPI -s -d 1', shell=True) | |
| msg = render_template('confirmed', confirmation="the t.v. is now off") | |
| return statement(msg) | |
| @ask.intent("TVSourceIntent", convert={'sourcename':str}) | |
| def sourcetv(sourcename): | |
| print sourcename | |
| sourcename = sourcename.lower() | |
| if sourcename == "kodi": | |
| subprocess.check_output('echo "as" | cec-client RPI -s -d 1', shell=True) | |
| msg = render_template('confirmed', confirmation="kodi is on t.v.") | |
| elif sourcename == "satellite": | |
| subprocess.check_output('echo "tx 1F:82:30:00" | cec-client RPI -s -d 1', shell=True) | |
| msg = render_template('confirmed', confirmation="telia is on t.v.") | |
| else: | |
| msg = render_template('sorry', apologies="batman did not recognise "+sourcename) | |
| return statement(msg) |
The code should be pretty straightforward: we define two intents, one to switch the TV on/off, and the other to change the source. Each intent accepts one input variable, to help us control the output of the function. Depending on this input variable, we issue a cec-client command which we explored in the previous section, that’s executed directly by the OS using the subprocess module in lines 6, 9, 18 and 21.
NB note that we use hardcoded commands – otherwise having “shell=True” would make these subprocess calls insecure
Once the command is run, we return a statement containing a message which Alexa will read out, which brings us to our next section…
Step 3: Building your Alexa Skill
The final step is to interface your Alexa to the program you just wrote above. Broadly speaking, the following three steps are followed:
- The user triggers Alexa into listening mode by using the trigger word “Alexa” (by default)
- Next, the user can speak several phrases that include the invocation name of your program which lets Alexa know that what’s coming next is meant as commands for your program. A word of caution here, make sure to use a clear but relatively unique invocation name. If you use an easily-misunderstood word like “Jarvis”, Alexa might not realise you mean to invoke your program. On the other hand, if you use a common invocation word like “Home Assistant”, probably some other published skill also has that same invocation – leading Alexa to enable that published skill rather than using your program. In my case, I used the invocation word “batman“, which is easily understood by Alexa, and doesn’t have any competing published skills. So in this case the invocation phrases I could use are:
- Alexa, ask batman to …
- Alexa, open batman and …
- Next comes the intent. These map directly to the intents we wrote in our program. In our case, we have two intents, (lines 1 and 13) which are the TVPowerIntent and the TVSourceIntent. Make a note of these names, because we need to instruct the Alexa SDK which utterances or phrases the user can speak to invoke or trigger these intents. For example, we might want the following:
- Alexa, ask batman to switch on the television => TVPowerIntent, with variable “power” = on
As a summary, we’d end up with the following command structure:

This mapping is done via the Amazon Developer Console. Make sure to login to the developer console using the same account in which the echo is registered.
If you followed the tutorial for flask-ask, you probably already have a skill defined. Just make sure that the invocation of the skill matches the invocation phrase that you’d like to use. In my case, the skill invocation is “batman”. The following steps assume you are using the Interaction Model Builder.
- On the left hand side, under intents, click “add new”. We define two intents, with the same names as the intents we defined in flask-ask above

- For each intent, we define a variable (or slot) to pass into our function. The name of the slot has to match the variables you defined in the @ask.intent lines of flask-ask:

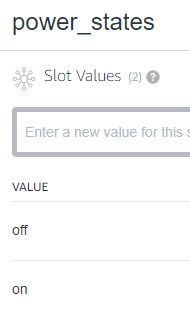
- Each slot is given a set of accepted values. You can use the built-in alexa values for word, names, or numbers. In my case I defined a custom value set (called “power_states” above, which has only two accepted values, on/off:
- Last, for each intent we define a set of utterances which will trigger our intent – our “intent phrase”. Put in as many variations as you can think of, to make it easier to call your program:

Note how the name of the variable or slot is {enclosed in curly brackets}.
The steps to make amazon invoke your program written in flask-ask are exactly the same as in the tutorial we referenced previously.
That’s it… save and build your model. (complete generated model code included at the end of the article)
This file contains hidden or bidirectional Unicode text that may be interpreted or compiled differently than what appears below. To review, open the file in an editor that reveals hidden Unicode characters.
Learn more about bidirectional Unicode characters
| { | |
| "languageModel": { | |
| "types": [ | |
| { | |
| "name": "power_states", | |
| "values": [ | |
| { | |
| "id": null, | |
| "name": { | |
| "value": "on", | |
| "synonyms": [] | |
| } | |
| }, | |
| { | |
| "id": null, | |
| "name": { | |
| "value": "off", | |
| "synonyms": [] | |
| } | |
| } | |
| ] | |
| }, | |
| { | |
| "name": "TV_Sources", | |
| "values": [ | |
| { | |
| "id": null, | |
| "name": { | |
| "value": "kodi", | |
| "synonyms": [ | |
| "code", | |
| "cold" | |
| ] | |
| } | |
| }, | |
| { | |
| "id": null, | |
| "name": { | |
| "value": "satellite", | |
| "synonyms": [] | |
| } | |
| } | |
| ] | |
| } | |
| ], | |
| "intents": [ | |
| { | |
| "name": "AMAZON.CancelIntent", | |
| "samples": [] | |
| }, | |
| { | |
| "name": "AMAZON.HelpIntent", | |
| "samples": [] | |
| }, | |
| { | |
| "name": "AMAZON.StopIntent", | |
| "samples": [] | |
| }, | |
| { | |
| "name": "TVPowerIntent", | |
| "samples": [ | |
| "turn the t.v. {power}", | |
| "turn {power} the t.v.", | |
| "switch the t.v. {power}", | |
| "switch {power} the t.v.", | |
| "turn {power} the television", | |
| "switch {power} the television", | |
| "switch the television {power}", | |
| "turn the television {power}" | |
| ], | |
| "slots": [ | |
| { | |
| "name": "power", | |
| "type": "power_states" | |
| } | |
| ] | |
| }, | |
| { | |
| "name": "TVSourceIntent", | |
| "samples": [ | |
| "put {sourcename} on t.v.", | |
| "put {sourcename} on television", | |
| "change channel to {sourcename}" | |
| ], | |
| "slots": [ | |
| { | |
| "name": "sourcename", | |
| "type": "TV_Sources" | |
| } | |
| ] | |
| } | |
| ], | |
| "invocationName": "batman" | |
| } | |
| } |

You must be logged in to post a comment.