
Gatsby.js has been making the rounds in the Twitterverse and it’s easy to see why. By cleverly combining various opensource projects they’ve made it easy to build web applications which are “static” in that the code can be hosted on any CDN, and it’s the client (web-browser or mobile app) which does the work of pulling in the dynamic data from various sources (like a WordPress blog). The mediator between the client and the data sources is GraphQL. It’s best summarized by this graphic on their own site:

What we’re going to tackle
In this article we’ll take a behind-the-scenes approach, and see what it takes to “roll your own”. When approaching a new framework it’s good to take a couple of hours to figure out how you’d implement something similar on your own steam, for a few reasons:
- It’s important to understand what’s going on behind the scenes. Not only does it help you explore pertinent technologies and how to use them, it also makes you a framework “power user” by allowing you to understand the framework better, that is – why the authors decided to write something in a particular way, why you need a certain plugin, and so on. To paraphrase Tony Stark in Spiderman: Homecoming :
If you’re nothing without the framework, then you shouldn’t have it
Tony JS

- It helps you appreciate the value of the framework. How much work does it save you when compared to rolling your own? Does it enforce good coding practices? Ironically, most times when attempting to do something on your own you realise just how much work and time a good framework saves you and your team
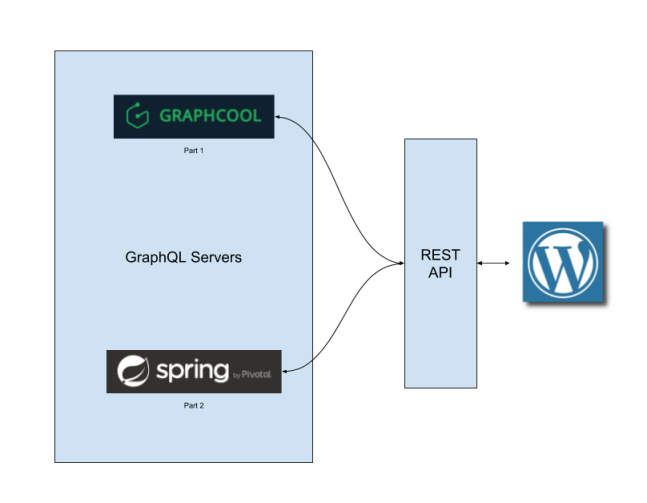
Even a simple build is enough to get you started. In this article, here’s what we’re building:

The idea is to “wrap” the REST API which wordpress.com provides into a GraphQL service which clients can then consume. We’re essentially emulating the wordpress Gatsby.js plugin here. In this article we’ll use the “Backend As A Service” called “GraphCool” which provides a cloud hosted GraphQL server for free (up to a certain number of requests). In a later article we’ll explore a straightforward alternative: hosting your own GraphQL server which is built using Spring Boot and the awesome GraphQL Java Tools
Enable and setup the WordPress REST API
This is an easy process, and wordpress have excellent documentation. In essence you first need to create a client application (while optional for this exersize since we’re going to be showing public posts only – you’ll need this if you do anything extra like creating posts). If you’re using wordpress.com like I am, client applications are created here:
https://developer.wordpress.com/apps/
Create a new application, and make a note of:
- Client ID
- Client Secret
Then proceed to read the getting started guide to get familiar with the API here:
https://developer.wordpress.com/docs/api/getting-started/
WordPress.com implements an OAuth2 authentication scheme as explained in their documentation, but programming this is out of scope of this article, so we’ll get a bearer token by issuing a curl request to the following URL (changing the appropriate parameters):
https://public-api.wordpress.com/oauth2/authorize?client_id=your_client_id&redirect_uri=&response_type=code&blog=1234Make a note of this token because we’ll be using it to authenticate our requests from the GraphQL servers.
Using GraphCool
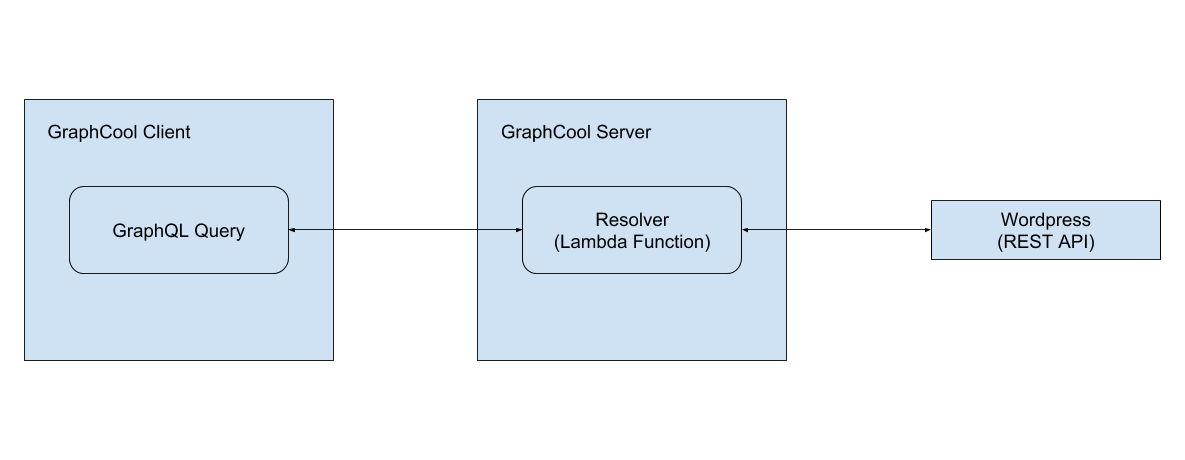
I chose GraphCool for this exercise because it also includes “Functions as a Service” (a.k.a “serverless”) which behind the scenes allows you to run server side javascript code within a NodeJS runtime hosted by AWS Lambda functions. We need to write such a function to act as our resolver for GraphQL queries asking for our WordPress posts.
Getting started is easy enough, as their site outlines:
npm install -g graphcool
graphcool init wordpress-wrapper
cd wordpress-wrapper
First, let’s define that resolver. We need to tell GraphCool where to find the resolver code, and which GraphQL queries this resolver will server. Open graphcool.yml and add the following code under the “functions” section:
functions:
  posts:
    handler:
      code: src/posts.js
    type: resolver
    schema: src/posts.graphql
The functions section defines our lambda function resolvers. As you can see, we added a subsection called posts which has it’s code defined in the file src/posts.js and the schema for the GraphQL requests it serves under src/posts.graphql. Let’s define this latter schema file:
extend type Query{
    posts(count: Int): [Post!]!
}

type Post @model{
    id: ID! @isUnique
    title: String!
    content: String!
}
Note: the annotations @model and @isUnique are imposed by the GraphCool service. In a plain vanilla GraphQL schema you could get away with not using these annotations.
This article assumes familiarity with GraphQL schemas, but in a nutshell the above schema defines a new Query posts which accepts a single parameter count of type Int. This query must (note the ! symbol) return an Array (note the [] symbols) that must contain elements of type Post. The definition for our custom Post type is right below the first paragraph. The Post type consists of three elements (all of them mandatory because all of them have the ! symbol): an ID field, and two String fields named title and content.
OK, so GraphCool now has the information on what type of query to expect, the structure of the query and the structure of the response. But how does it actually serve this data? That’s the job of the resolver, whose code is in the src/posts.js file. The code is relatively straightforward:
const fetch = require('node-fetch')
const baseURL = `https://public-api.wordpress.com/rest/v1.1/me/posts?number=`

export default async event => {
  const count = event.data.count || 2;
  const response = await fetch(`${baseURL}${count}`, {
                        headers: {
                                "Authorization": "Bearer xyz"
                      },
  });
  const resp_json = await response.json();
  return {
        data: resp_json.posts
  }
}
We basically have a single async function that accepts an “event” parameter. The event parameter’s data member variable contains the arguments that we expect to receive. Recall from the above schema that our query should contain a single “count” parameter of type Int. Incidentally, this is one of the advantages of using GraphQL – you always code against a defined, agreed upon schema. When then use node-fetch to fire of our GET request to the wordpress REST API (including our token which we got before, inserted into the Authorization Bearer header).
Once we receive the data, (note the await keyword), we return a JS object whose ‘data‘ variable contains the posts we’d like to send on to the client. One quirk with GraphCool is that the response is expected in a certain format – it has to include that “data” field. If this isn’t included, the GraphQL client will get a generic error:
Whoops. Looks like an internal server error. Please contact us from the Console (https://console.graph.cool) or via email (support@graph.cool) and include your Request ID: [...]Thankfully a forum post put me in the right direction – it turns out that when returning your data from the handler, GraphCool expects a ‘data’ member variable in the returned object.
Deploy and Test
That’s about it (not too hard). Go ahead and deploy the code:
graphcool deployYour code should now be live on the GraphCool BaaS, which you can confirm by visiting https://console.graph.cool, and checking that your postsfunction has made it up to the cloud successfully:

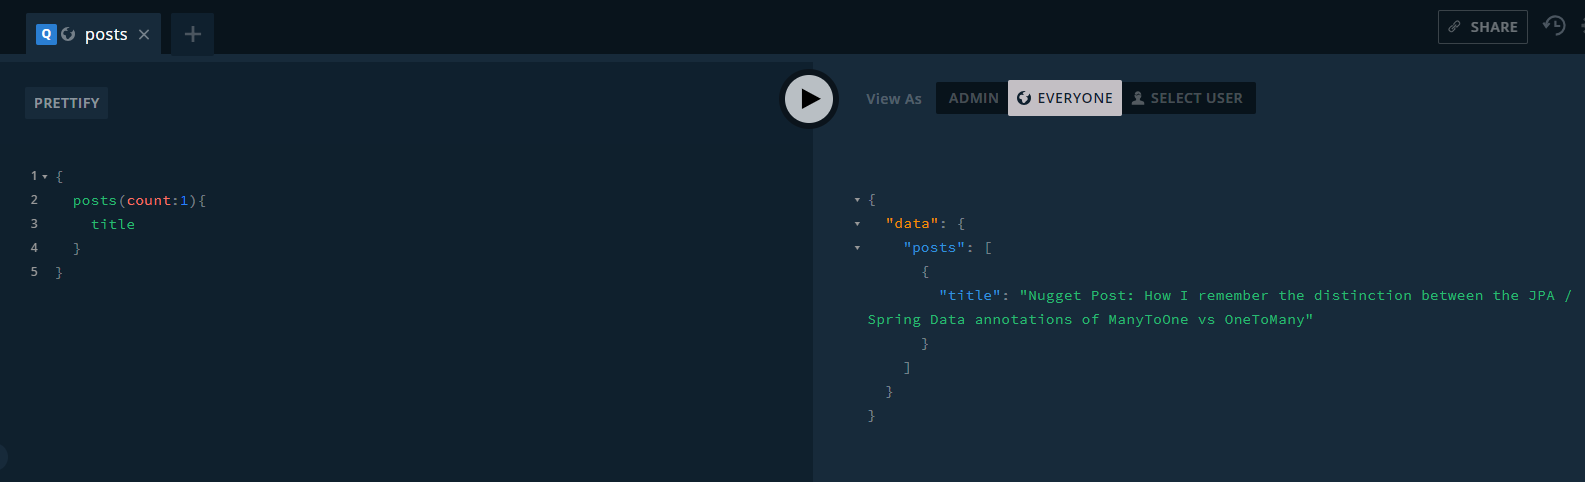
At the bottom left corner of this screen you’ll also have access to the “playground“, which is a good place to practice your GraphQL queries:
Conclusion
In this post we replicated a single Gatsby.js plugin – the WordPress plugin. During this replication we saw exactly what sort of work goes into creating such a plugin, and the advantages of using GraphQL vs plain old REST.
Stay tuned for the next article when we do the same thing – only this time on a self hosted Java Spring Boot server, using Java GraphQL Tools!

One thought on “Inspired by Gatsby.js : Rolling your own GraphQL powered WordPress API”
Comments are closed.