

In a previous blog post titled ‘OTRS custom “Additional ITSM Fields”’ I wrote on how to extend OTRS to better suit an organisations particular needs. Michiel Beijen from the OTRS team pointed out that the method presented there is outdated in v3.1, and suggested the use of Dynamic Fields. I’ve finally had the opportunity to follow up on Michiel’s advise in a recent project I was involved with. This article will explore the configuration process for using Dynamic Fields as well as some tips and tricks learnt along the way. Throughout the article, I will give examples from my particular OTRS use case scenario.
In this use case scenario OTRS was already installed as your typical helpdesk system. We now wanted to extend OTRS to also work as a bug tracker. Since OTRS was already installed and used, we wanted to converge on this system as much as possible. OTRS has all the capabilities of a software bug tracker, with queues for each dev team, time accounted fields for tracking time and effort spent, and each ticket representing a bug that needed solving. However, out of the box we need extra fields describing “categories” – where each ticket/bug can be categorized according to field such as security, usability, and so on. This is where dynamic fields come into play. Using OTRS it is possible to create a custom field – text, multiple choice, etc – that is also nonviolently searchable.
The procedure to define a new dynamic field is:
- Login to the admin interface (using root@localhost by default)
- Follow the documentation located here: http://doc.otrs.org/3.1/en/html/dynamicfields-configuration.html#dynamicfields-configuration-add. For example, in my case, creating a new “category” dynamic field involved:
- Admin > Ticket Settings > Dynamic Fields
- Since I want this new dynamic field to apply to the whole ticket, I selected “dropdown” from under “Ticket” on the left hand menu, rather than from “article”, which would have applied the dynamic field to a particular entry within the ticket
- Modify the field to your needs. Make a special note of the “name” since you will be referencing it later. In my example, I chose the name arbitrarily to be “CloudLinkCategories”
- That’s about it, however there are a few tips. Add the dynamic field to the following:
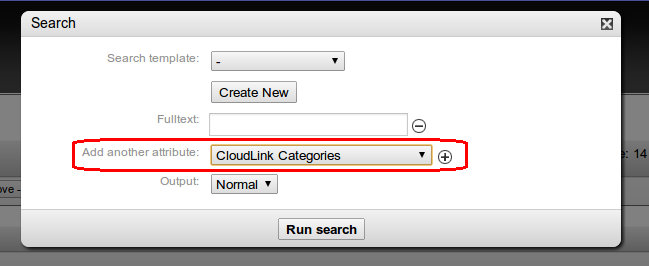
- sysconfig > tickets > Frontend::Agent::ViewSearch
The above will allow you to have dynamic field as searchable attribute in the agent search function (update: apparently in v3.2 this is included by default)
- sysconfig > tickets > Frontend::Agent::ViewZoom
The above will allow the dynamic field to have it appear in ticket details on right hand side of the agent view, along with all the other default ticket properties

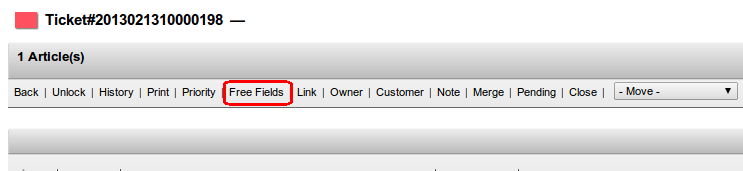
- sysconfig > tickets > Frontend::Agent::ViewFreeFields
The above will allow an agent to edit the dynamic field by clicking on the “Free Fields” entry in the menu bar
- sysconfig > tickets > Frontend::Agent::TicketOverview
The above will make the dynamic field appear in ticket table overview
In each of the above sections, you will see an entry containing “DynamicField”, where under “Key” you can enter the “name” of the Dynamic Field you created earlier
As a final note, you can use the dynamic fields in the OTRS statistics module, which is handy for graphing the amount of time spent on each category over a given time period.
